HTC Desire S - detailed instructions for getting root and installing custom firmware. Root Desire V
Unlocking the bootloader, installing recovery, getting root, flashing Custom ROM
At the moment, there is very little information on unlocking the HTC One X, and this is not surprising, since the model appeared relatively recently.
In this manual, I will describe how to unlock the bootloader, install a modified recovery and use it to subsequently gain root rights or flash custom firmware.
Remember, unlocking the bootloader through the official website htcdev.com is irreversible and after unlocking you will lose the warranty.
[My note: officially on htcdev it is written that you will only lose the warranty on software, not hardware (if the kernel has not been flashed)]
Part 1
Unlock BootLoader
So the first thing we need is to download and install HTC Sync from the official HTC website. [My note: I didn't need HTC Sync]
Next in order:
Go to the link www.htcdev.com/ and create yourself an account on HTCDEV.
Download fastboot files: fastboot.zip (172.94 KB) Number of downloads: 5250
Create a new folder on your C: drive and name it Android.
Extract the downloaded ZIP from step 2 into the folder you created.
Go to www.htcdev.com/bootloader/, select All Other Supported Models in the list of devices and then click on the begin unlock bootloader button
Answer “Yes” to the question. Check both boxes, click next
Go to step 8 on HTC Dev, since we already have everything we need and what we are asked to do over the next 7 steps.
[(Windows XP - Click Start > Run >
(Windows 7 - Click Start >
Code
CD C:\Android
Now enter
Code
fastboot oem get_identifier_token
In the command line you will see a whole bunch of inscriptions, right-click and select “mark”, then use the keyboard arrows to go to the line<<<< Identifier Token Start >>>>,
hold down the SHIFT button and also use the keyboard buttons to select what is indicated in the figure below:
Reduced by 43%
700 x 531 (202.89 KB)
To copy the selection, right-click on the text.
Paste the copied code into the field at the bottom of the page, click the SUBMIT button and very soon you will receive a letter from HTCDev with a link to the second part of the instructions and the “Unlock_code.bin” file attached to the letter.
Download “Unlock_code.bin” from your email and save it to the Android folder that we created in the 3rd step in the root of the C: drive.
Enter at the command line:
Code
fastboot flash unlocktoken Unlock_code.bin
A message will appear on the phone's display asking you to confirm your intentions to unlock the bootloader, press the Volume + button to select YES and confirm by briefly pressing the Power button.
Part 2
Flashing custom Recovery and installing custom firmware
Download CWM recovery from here.
Place the file you downloaded in the same folder where the Android files are located, that is, C:\Android
Hold the power button for 10 seconds, the phone will flash the touch buttons several times and begin to reboot. You need to press and hold the volume down button as soon as the screen goes dark, the phone will reboot into the bootloader. If you did this but the phone just turned off, then turn on the phone by holding the Power and Volume Down buttons
Select Fastboot. Navigate through the menu items using the volume keys, and to select, briefly press the power button.
Connect your phone to your computer and open Command Prompt.
(Windows XP - Click Start > Run > type CMD in the box and press Enter)
(Windows 7 - Click Start > type CMD in the search box and press Enter)
Using the command line, navigate to the folder where we placed the files:
Code
CD C:\Android
Now enter on the command line:
Code
fastboot flash recovery name_downloaded_recovery.img
Hold the power button for 10 seconds, the phone will flash the touch buttons several times and begin to reboot. You need to press and hold the volume down button as soon as the screen goes dark, the phone will reboot into the bootloader. If you did this but the phone just turned off, then turn on the phone by holding the Power and Volume Down buttons
Select Recovery. Navigate through the menu items using the volume keys, and to select, briefly press the power button. The phone will reboot and you will be taken to CWM Recovery.
Select backup and restore
Select backup and wait, when the operation is complete you will see a message on the smartphone screen “Backup succesfully completed”.
Select Reboot System Now and wait until the phone reboots.
Part 3
Root or Custom
Now we have 2 options - just get root or sew custom.
[My note: as a proponent of the drain, I advise the first, because. There’s nothing useful in custom yet]
Attention! The firmware can take about 10 minutes to unpack. Before flashing the firmware, be sure to charge the device to at least 70%.
So, to get root on stock firmware, you need to download and flash this archive via CWM Recovery:
CWM-SuperSU-v0.96.zip (668.12 KB)Number of downloads: 1442
So we downloaded the archive in ZIP form, you need to put it into the memory of your phone (without unpacking), then reboot into recovery and do this:
install zip from sd card
Choose zip from sdcard and find the file we downloaded there, select it and confirm “YES”
After installation reboot system now.
That's it, now we have root rights
To flash a custom one, you need to download it, I tried several firmwares and stopped
on LeeDrOiD One Xtreme V2.2.0 (Description on XDA).
I’ll pour a little water on why this particular firmware.
The first thing I didn’t like about the stock firmware was the strip with three dots at the bottom of the screen for applications written under 2.3 and with support for the hardware menu button. In this firmware, the button for viewing recently launched applications now works as a hardware menu button, and to get a list of recently launched applications, you need to hold down the house as before
2 - Select reboot options. Availability of the Russian language without installing More Locale, full support for Landscape mode and customization of the status bar.
3 - Cut out a little extra, the rest that was not needed was cut out myself using Root Uninstaller Pro
So let's get started
We downloaded the latest firmware and here are the installation instructions:
Copy the archive we downloaded to the device’s memory.
Reboot into CWM recovery
Select wipe data\factory reset
Select wipe cache
Select Install zip from sd-card
Select the item Choose Zip from sd-card and find the file we downloaded in memory, select it and confirm “YES”
The Aroma installer's own menu will pop up, offering you a choice of what to do, what to install and what to delete, it's not difficult, I think you'll figure it out.
After the entire procedure, you will see the message Install from sd-card successfully completed.
Select Reboot system now.
Would you like to root your HTC Desire? I think so, especially since you can use it to install Android 4.0 Ice Cream Sandwich in the future.
This method of rooting HTC Desire is not new, but it is still effective.
Requirements
- HTC Desire
- Windows PC
- unrEVOked³ (version 3.32) for Windows - can be downloaded (reflash_package.exe, 27.4 Mb)
- unrEVOked³ modified USB/HBOOT drivers - can be downloaded (android-usb-driver.zip, 6.1 Mb)
- Download the latest version of unrEVOked forever (unrevoked-forever.zip, 220 kB). Rename the file to update.zip after downloading.
- Back up all important data such as call log, SMS, contacts and internet settings.
- Make sure the battery is charged to at least 70%.
- Remove HTC Sync from your computer.
- Uninstall any other software that interacts with your phone (such as DoubleTwist).
Attention
Use this guide at your own risk. We are not responsible for any damage to the device.
Instructions
- Unzip the file android-usb-driver.zip to a folder on your desktop.
- Turn off your phone
- Reboot your phone into HBOOT by holding the Volume Down button and the Power button until the HBOOT menu appears.
- Use the Volume Down button to highlight HBOOT USB. Press the power button. Your phone will begin checking for updates. Wait until the check for updates finishes.
- Connect your phone to your computer via a USB cable.
- Open Device Manager by clicking the Start button and selecting Control Panel, System, and Device Manager.
- Look at "Other Devices" in the list. It should say something like "Device Android 1.0".
- Right-click on this item and select "Update Drivers" from the menu.
- Navigate to the folder where you extracted the contents android-usb-driver.zip.
- Click the button Further.
- Your computer will begin installing drivers.
- Look again in Device Manager and make sure that "Android Bootloader Interface" is listed under "Android Phone".
- Disconnect your phone from your computer.
- On your phone, go to Settings > Applications > Development > and enable USB Debugging.
- Go to Settings > PC Connection > Default Connection Type > and select Charge Only.
- Connect your phone to your computer again using the USB cable.
- Run reflash_package.exe on the computer.
- Follow the instructions on the screen.
- Copy update.zip to a folder /sdcard on the phone.
- Remove the battery from the phone.
- While holding down the Volume Down key, insert the battery.
- Use the volume keys to highlight in the menu RECOVERY. Press the Power button to select it. Your phone will go into recovery mode.
- From the menu, select Apply sdcard:update.zip. The update installation will begin.
Congratulations! Your HTC Desire now has root rights, an unlocked bootloader, S-OFF and ClockworkMod.
There are several ways to open Root access for smartphone.
First, through the menu CWM Recovery. I’ll describe it point by point, but first I want to remind you that the bootloader must be unlocked. Well, now let's talk about everything in order.
- You need to download “CWM Recovery” to your PC; the program is very popular, and therefore it is very easy to do.
- Rename the downloaded recovery to “recovery.img”
- Find and download the archive from “ADB”.
- In the root of drive D: create a folder and change the name to “Root”.
- Extract the “ADB” archive to a new folder.
- Turn off the phone, remove the battery from it for a couple of seconds, and put it back in place.
- Press “Power” and “Volume -” until the engineering menu loads.
- On your smartphone, select “Fasboot” and press “Power”. Moving up and down the menu is done using the “Volume +, -” buttons.
- We connect the smartphone and computer with a USB cable.
- Open the command line on the PC and write the commands in it
- D:
- cd D:/android
- fastboot flash recovery recovery.img - Once the installation is complete, select “power down” on your smartphone.
- Download the archive with root and transfer it to the device’s memory card.
- Turn on the phone in bootloader mode.
- Select the “recovery” item and press “Power”.
- Next, click on “install zip from sd card”.
- After installation is complete, reboot your smartphone.
Root access to your smartphone is now obtained.
Method No. 2
Obtaining rights using the program Universal Root.
Everything is simple here. First, remove the block from the bootloader. Then download this application and copy it to the memory card. In the smartphone settings, check the “Install from an unknown source” checkbox. Next, find our application on the memory card and click on it once. Your smartphone may give you the message “This application may harm your device,” ignore it and click continue. After installation, open the program and click on “Root”. We reboot your htc and that’s it, the rights are obtained. It is worth noting that this is not a 100% option and may not root the device or damage system data, so it is best to create a restore point or synchronize the data.
Method No. 3
Installation from a memory card. Loading the archive. Change the archive name to “update.zip” and move it to the root of the memory card. Turn on the smartphone in bootloader mode. After a couple of minutes, the program will automatically find the update archive and offer installation. Use the “Volume” key to select “Yes”, the firmware will begin. Upon completion, you need to reboot the device and delete the archive from the memory card so that the next time you boot, the program does not start installing updates again.
In the second half of 2011, HTC announced changes to its policy regarding loader protection and provided a way to officially unlock existing protection using the website htcdev.com. However, it is worth considering that using this opportunity, you will still lose the warranty. In this regard, in all new official firmware, starting with update 2.3.5, the loader state S-ON an additional state has appeared, now there are three of them: LOCKED, RELOCKED And UNLOCKED.
S-ON LOCKED indicates that the loader on your phone has been blocked.
S-ON RELOCKED– this RELOCKED state indicates that your loader is locked again, but before that it was already unlocked through the official website htcdev.com.
S-ON UNLOCKED– this state indicates that the loader is unlocked through the official website htcdev.com. In this case, not all memory is unlocked, unlike the case with S-OFF, so you will have to install firmware on it in two stages (more on this below). It is also worth noting that UNLOCKED does not unlock the loader partition, so you will not be able to flash to another HBOOT, and you will not be able to flash another radio module. But in S-OFF it is still possible.
How to find out which device you have S-ON or S-OFF
You need to remove the phone from fast boot mode: Settings -> Power -> Fast boot and uncheck the box here. Next, do the following:
Turn off the phone;
Press and hold the volume down button on the device and turn on the phone;
In the first line it will be written in caps S-ON for you or S-OFF;
How will it look like:
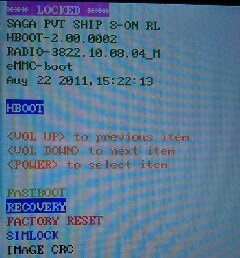
S-ON: 
S-OFF: 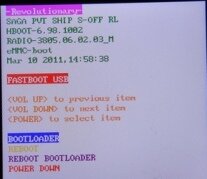
If you have S-OFF or S-ON UNLOCKED, then go straight to the point 4 .
2. When S-ON, then you need to find out your version HBOOT.
HBOOT starts immediately when the phone starts, it is responsible for checking, as well as hardware initialization of the software. This is a kind of BIOS on a PC.
How to find out the HBOOT version
You need to remove the phone from fast boot mode: Settings -> Power -> Fast boot, uncheck the box here. Further:
- turn off your phone;
- press the volume down button and keep it pressed, turn on the phone;
A screen will appear with three green robots at the bottom;
The second line from the top is the HBOOT version of your device.
3.
Get S-OFF or unlock the loader at stage UNLOCKED, can be done in different ways, depending on the loader version:
Before performing the operations described below, you must install the driver HTCDriver3.0.0.007.exe
For Hboot versions 0.98.0000 And 0.98.0002 the following: instructions for getting S-OFF through Revolutionary, instructions can be followed until you get root.
For Hboot version 2.00.0002
there are two options:
Attention, remember that all your data will be erased!
- get S-OFF by returning to the previous firmware:
For the number, software (Settings -> About phone -> Software version) up to version 2.10.401.8 inclusive, is done according to these instructions: HTC Desire S - Firmware (OS 2.3).
For the software version number 2.10.401.9, follow this link: HTC Desire S - Firmware (OS 2.3), but in point No. 2, you need to download firmware for Europe version 1.47.* RUU_htc_Europe.
So, you get the old firmware with the same old HBOOT, for which you get S-OFF via Revolutionary.
- Using this link, unlock Bootloader from HTC, as well as unlock HBOOT in S-ON UNLOCKED. We remind you that in the case of S-ON Unlocked, you can get root, then flash another firmware or another kernel, but you cannot change the hboot and radio module). This method, in theory, forever deprives you of the warranty, because... IMEIs that are involved in unlocking through the site will be blacklisted and you will be denied a warranty claim at all official service centers. Do not pay attention to the fact that our device is not officially supported on the manufacturer’s website; select “All other supported models” from the list. Register and do everything following the instructions. There is no point in screenshots, because... everything is so detailed and as clear as possible.
HTC Desire S - detailed instructions for getting root and installing custom firmware:
rating 80 out of 80 based on 80 ratings.
There are 80 reviews in total.
You ask - How to root HTC Desire HD? Then this article is for you!
This is an easy way to obtain Root rights to HTC Desire HD using a computer. The main thing is to be careful!
To root HTC Desire HD you will need:
1. Personal computer
2. Unlocked bootloader on the device, you can get >>AdbRun
5. Download CWM recovery - >>link
6. File >>UPDATE-SuperSU.zip
7. Get S-OFF, what it is and why you need it and how to do it, read >>here
Certain conditions are required:
1. Battery charge on HTC Desire HD is at least 50%
2. Original USB cable
Instructions:
1. Connect the device to PC via USB cable
2. Throw over UPDATE-SuperSU.zip into the device memory.
3. Turn off the device and turn it on in Bootloader mode. As the pictures show 

4. Run the previously downloaded and installed program AdbRun
5. Go to item Fastboot -> Recovery 
6. Transfer the previously downloaded recovery file to the window that opens recovery-clockwork-5.0.2.0-ace.img close the window and press Enter
7. If everything is successful, the phone will reboot
8. Turn off the device and boot into mode Recovery(hold volume down and turn on)
9. Select the item apply update from sdcard (use the volume down and up buttons to move through the items, use the on button to select an item) And if you have CWM recovery, then select the item install zip from sdcard
10. Select previously moved to the root of the device UPDATE-SuperSU.zip and confirm the installation.
11. Rejoice at the root!
Latest site materials
Windows 8

All About the Moomins by Tove Jansson
Tove Jansson Tales of Moominvalley DET OSYNLIGA BARNET OCH ANDRA BERÄTTELSER Copyright © Tove Jansson, 1962 Schildts Förlags AB, Finland. All rights reserved. © S. Plakhtinsky, translation, 2016 © Edition in Russian, design. Publishing Group LLC
Windows 8

How to create a virtual phone number
We've released a new book, Social Media Content Marketing: How to Get Inside Your Followers' Heads and Make Them Fall in Love with Your Brand.
Computer

Most web services and social networks require the user to provide a phone number when registering. From point of view
Microphones for passing exams: types, photos, reviews
Windows 8

Hidden headphones Would you like to buy a hidden earphone in an online store? Then you have come to the right place, as we always offer popular models at a reasonable price. These headphones are distinguished by a progressive approach in which transmission and
How to delete a page on VK?
Browsers

Every person registered on a social network may want to delete their page completely, or for some period of time. The time given by developers for reflection varies from one month to six months. This is due
Finding duplicate files using CCleaner How to find identical files on your computer
Browsers
 on their hard drives. Each of these copies, of course, takes up space on the hard drive. A")
Good day. Statistics are an inexorable thing - many users sometimes have dozens of copies of the same file (for example, a picture or a music track) on their hard drives. Each of these copies, of course, takes up space on the hard drive. A
I first encountered the question of how to install Windows on a computer at checkout 4. There was no Internet where I lived, so this question was especially difficult for me. At the end of the 4th grade, my father bought me a book, I don’t remember exactly what it was called, approximately “Os