Device manager windows 7 hotkeys. How to open Device Manager
The Device Manager in the Windows operating system collects information about the hardware of your computer or laptop. Device Manager is necessary to collect information about all devices that are installed on the computer. You can also use it to remove a device from the system or update drivers for it. In general, this device manager is a very useful and necessary thing. For example, to install drivers after reinstalling the system, when you don’t know exactly which components you should install drivers for (an exclamation mark appears next to the device name).
Today I will talk about how to launch Device Manager. This can be done in different ways and they all lead to the same result, so which one should be used is up to you to decide. Everything will take you a few seconds.
Method 1
Find the “Computer” icon on the desktop (if you don’t see it, click the “Start” button - it will be on the right side of the screen), click on it once with the mouse and click on the right button. A menu will appear, select “Properties”.

Here is a window for viewing basic information about your computer. On the left side of the window you will see a small menu. Select “Device Manager” from it.

Voila, Device Manager is launched.

Method 2
Look for the “Computer” icon again and click on the right mouse button. Only now in the menu we select the “Management” item, and not “Properties”.

A window titled “Computer Management” will appear. Select "Device Manager" here.

Method 3
Another option. Click on the “Start” button and add the following word to the “Search programs and files” line: devmgmt.msc. Press Enter.
In a computer, as in an army, the commands of the commander in chief (the processor) must be carried out quickly and accurately. System and peripheral combat units within the PC act harmoniously, each knows the assigned task and receives from the system the necessary resources to successfully complete it. It’s just that in the army the operational headquarters monitors the interaction of various branches of the military, and in a personal computer these functions are performed by the Windows Device Manager.
Calling the Windows 7 Device Manager
Device Manager is a special program that allows you to flexibly interact with the Microsoft Management Console (MMC), which first appeared in Windows 95. Using the manager, the user can view all devices installed on the PC, obtain information about the resources allocated to them, and control how they are turned on/off , as well as manipulate drivers.
There are several ways to open the Device Manager window:
- using the Windows Control Panel;
- via the command line or the Run window;
- through the interface of the OS itself.
Since the dispatcher is formally located in the control panel, to call it we will first need to open this panel:
You can do without searching. To do this, select the “System and Security” section in the control panel and go to the “Device Manager” menu item in the “System” subsection.
You can also launch the console snap-in through the Computer Management window.

You can launch the dispatcher even faster by calling it by file name. To do this, you just need to open the “Run” window (Win + R), write devmgmt.msc in it and click OK. Using another hotkey - Win+Pause - you can open the "System" window of the Windows Control Panel, which also contains a link to launch the Device Manager.
Showing hidden hardware in Device Manager
The manager window provides graphical information from the Microsoft management console about the equipment installed on a personal computer or laptop. Devices in the list can be grouped either by type or by connection. You can change the grouping principle by selecting the appropriate item in the “View” menu.
The Windows 7 Device Manager window provides information about the hardware installed on your personal computer.
Devices that are not recognized by the system (for example, if there are no drivers installed for them) or operate with errors are marked with a yellow triangle with an exclamation mark inside.
However, in its standard form, the device manager does not show all the equipment known to it, because the system may also contain so-called hidden devices. One of the typical types of such equipment are devices with previously installed drivers, which are now disabled. To view hidden devices, go to the “View” menu of the manager and check the “Show hidden devices” checkbox.
There is one more small but important nuance when displaying hidden devices.. Device Manager stores information even about those previously installed devices that are currently disabled (physically absent, disabled in the BIOS, etc.). The environment variable DEVMGR_SHOW_NONPRESENT_DEVICES is responsible for displaying this type of equipment. If it is assigned the value 0, then the device data will not be shown to the user. Before starting the MMC console, the value of this variable is checked by the devmgr.dll library. It is worth mentioning that such ghost devices can cause conflicts with existing equipment. So, when installing a new network card, the system can warn you about a conflict of IP addresses with the controller that was installed in this PC sometime in the past. To obtain information about installed but currently disabled hardware in Device Manager, follow these steps:

In the future, these two commands can be formatted as a bat file to significantly simplify launching the device manager with the parameters you need.
If Device Manager does not open
Sometimes users face problems when opening Device Manager using any of the methods described above. It may simply not start, or a window may appear indicating various errors. In the vast majority of cases, this behavior of the operating system is caused by the consequences of computer viruses. It also happens that the device manager files on the disk are damaged or missing, which can also be caused by the machinations of malware that have entered your PC from the network. In any case, the first thing you should do is check your computer for viruses and, if any are found, get rid of them. If you do not have any anti-virus software installed, we recommend downloading at least a portable, constantly updated and free utility from Dr.Web and checking your PC with it.
If the problem with starting the manager cannot be solved by cleaning it from viruses, use the built-in capabilities of the OS to find errors and restore damaged system files. To do this you will need to do the following:

You can independently check the presence of the necessary files in the System32 subdirectory of your OS. If you have problems launching the Device Manager, you should make sure that the devmgmt.msc file itself is present on the disk, as well as the libraries devmgmr.dll, msxml3.dll, msxml6.dll and others. If these files are missing, you will have to use a bootable LiveCD and manually copy them from the Windows 7 distribution.
Common problems when working with Device Manager
If you were able to successfully launch Device Manager, you may still encounter a number of problems while working with it. For example, the device you need will not be displayed in the list, the manager will not be able to detect it when updating the equipment configuration, or even the manager window will be completely empty. Our advice will help you overcome these unpleasant moments.
Empty Device Manager
There are several main reasons why the dispatcher window can shine with pristine whiteness.
Most likely, malicious viruses, for example, may again be to blame for this. In this case, scan your PC with an anti-virus scanner and get rid of unwanted “guests”. For the Apropos virus, the easiest solution is to use the utility. Boot your computer into Safe Mode, extract the AproposFix files from the archive and run the RunThis.bat file. When the virus removal procedure is completed, the program will write a log file to disk, which will list everything that was found and fixed (or deleted).
Another reason for an empty device manager may be a disabled Plug & Play system service, which is responsible for recognizing changes in installed hardware. To enable this service, you must complete the following steps.

In addition, you may not have access to entries that describe devices in the system registry. To resolve this issue, you will need to launch Registry Editor and follow these steps:

What to do if an unknown device is detected
Windows considers unknown equipment to be any hardware for which there is no driver, or one exists, but is intended for a different version of the system, or the OS was unable to recognize the device identifier code used in the Plug & Play standard. The most often unknown are complex and composite devices that work in the USB and IEEE 1394 standards and do not fall into any of the classes defined for Windows and supported by the system.
Such a device is marked in the dispatcher with a special icon - an exclamation mark in a yellow triangle.
Unknown devices are marked with a special icon in the form of an exclamation mark on a yellow background
In order for Windows OS to see and recognize the connected device, you must install its driver, either using the update center or downloading the installation package yourself from the equipment manufacturer’s website. To do this, right-click on the unknown hardware, select “Update driver” from the menu that opens and follow the system prompts.
Video: how to install a driver through Device Manager
If you don't know what kind of device it is and where to get a driver for it, try searching for the required software by hardware identifier.

Video: how to find a driver by device ID
Problems with USB ports
Since the USB controller, like any equipment, interacts with the OS through a driver, first make sure that all the necessary drivers are installed from the motherboard disk.
If everything is fine with installing the drivers, but your computer suddenly stops detecting USB devices, a simple system reboot can help you. Restart your computer normally. With a high degree of probability, we can assume that after a restart this trouble will disappear without a trace.
In the case when an immediate reboot is undesirable for some reason (for example, you are running some long-running task that you don’t want to interrupt), you can use the device manager for a gentle “reboot” (restarting only hardware drivers).

Another way to get the ports to work is to remove and then rearrange the USB controllers.

If you consider yourself a fairly experienced user who knows how to handle the Windows system registry correctly and without destructive consequences for the PC, you can try another error correction option to get rid of the problem with USB ports. To do this, launch from the “Start” menu or using the “Run” window (Win + R) call the regedit registry editor and perform the following actions in it:

COM and LPT ports are missing in Device Manager
Sometimes you may need to configure the parameters of a serial COM port (for example, if you want to connect a programmer or a specialized industrial controller to your computer), and this section, as well as the ports themselves, are not in the device manager. It should be noted that in modern computers, especially laptops and netbooks, COM and LPT ports may be completely absent on the motherboard as unnecessary. The required ports can simply be disabled in the BIOS and therefore not appear in the manager. If you want to use a COM or LPT port, be sure to go into the BIOS and enable this type of hardware. It's a good idea to make sure that the drivers for your computer's motherboard are installed and up to date.
If the above tips do not help, there is an option to force these ports from the Device Manager itself. To do this you need:
- In the “Action” menu, select “Install old device”.
To install missing ports, select “Install old device”
- Select the required type of equipment.
In the list of equipment types, select the line “Ports (COM and LPT)”
- Select the required port.
We indicate which port we need to install: serial (COM) or parallel (LPT, printer port)
- If necessary, configure the port that appears in the device manager.
All that remains is to configure the port that appears in the list of equipment or update its driver
The printer connected to the PC was not detected
First of all, make sure that the printer is physically connected to the PC. Check the cord itself, as well as the condition of the connectors on the printer and motherboard. If your printer is not listed in the device manager, but is visible in the Devices and Printers section of the control panel and prints with noticeable delays, this may indicate that it does not have enough USB power. This problem can be resolved by connecting the printer not directly to the PC, but via a USB hub with additional power to the ports. If you are working on a laptop, you should make sure that the USB controller does not turn off when switching to power-saving mode. To do this, you will need to prevent Windows from managing the power supply of the USB controller so that the OS does not turn off this equipment when it is forced to idle in order to save energy.
Uncheck the box that allows the system to turn off the USB controller to save power
If your printer supports Plug and Play, but when you connect it, it does not appear in the Device Manager under "Printers", make sure that there are no other unknown devices in the device manager. It is possible that the drivers for the printer have crashed, and now the dispatcher simply cannot identify it correctly. Reinstall the drivers and restart your computer.
If you are using an older printing device that does not support this standard, remember that Device Manager considers such equipment hidden by default. To display equipment of this type in the tree of installed devices, check the “Show hidden devices” option in the “View” menu. Then look for information about the printer in the “Non-plug and play device drivers” section.
Information about printers that do not support the Plug&Play standard can be found in the “Non-plug and play device drivers” section
What to do if the monitor is recognized as universal
Modern monitors in most cases are recognized by the system as a “Universal PnP Monitor” and do not require the installation of special drivers. But for older monitors this may be a problem. Often Windows sets them to "Default Standard Driver (VGA)". However, this mode may not support the monitor's native resolution or refresh rate, which may cause inconvenience when using the computer. Usually the monitor is not detected correctly if the native drivers for the video adapter have not been installed.
For many modern monitors, a standard driver is sufficient, but it may not work correctly with older models.
To install the required monitor driver, boot your computer in safe mode. Uninstall the video card driver and restart the computer again. The system should recognize your monitor again, after which you can reinstall the drivers for the video adapter.
If your monitor supports multiple connection methods to a PC, try connecting it in a different way, for example, use an HDMI port instead of a DVI port, or connect the PC's DVI connector via an adapter to the monitor's VGA connector.
Sometimes it is impossible to properly calibrate a monitor without native drivers
Disk drive missing from device manager
If you are using an IDE or SATA drive, make sure it is recognized correctly in the appropriate BIOS window. The absence of a drive in the BIOS settings may be due to a poor connection of the power cable, insufficient output power of the built-in power supply, or even an incorrect combination of Master/Slave switches (jumpers) that distribute the roles of devices connected via one IDE cable. If the drive is detected in the BIOS, remove and reinstall the IDE/ATAPI drivers:

After reboot, the drivers will be installed automatically.
If you use an external or internal USB drive, visit the motherboard manufacturer's website to download and install the latest drivers specifically for your model of USB controller built into the chipset. It is worth noting that in such circumstances, problems with the PC will not be limited only to the disk drive; flash drives and other devices connected via the universal serial bus will also not work.
Perhaps the lack of a disk drive is caused by third-party software for working with CD and DVD drives (utilities for burning disks, creating virtual drives in the system, etc.). Uninstall the program data from your PC and restart your computer. If the situation does not improve, try manually clearing the registry of possible changes they may have made. For this:

Video: how to restore a disk drive in Windows 7 Device Manager
Device Manager does not see video cards
If your graphics card was not working at all, you would hardly see the Device Manager window. Perhaps the system simply could not find the necessary drivers and identified the video card as a standard VGA video adapter. Find this line in the manager and update the driver for the device, having first downloaded the latest version from the manufacturer’s website, designed specifically for your operating system. It is worth remembering that for NVidia video cards there are different drivers for video adapters on desktop computers and graphics cards installed in laptops. For the latter, look for drivers with an "M" at the end of the series (for example, NVidia 9600M Series, not NVidia GeForce 9600 Series).
In addition, you should make sure that there are no unknown devices in the manager. For example, the nVIDIA video card driver on Sony laptops may not install correctly if the SFEP driver is not installed on the system (the Sony Firmware Extension Parser device is considered unknown in the manager).
If the driver is installed incorrectly, the video adapter is defined as standard, and unidentified objects appear in the “Other devices” section
If the PC configuration simultaneously contains a built-in and discrete graphics card, one of the video adapters may generally be recognized as an unknown device. In this case, install the required driver from the disk included with the video card or download it from the Internet. In the case of two video adapters, one of them may be physically disabled, as a result of which it is not in the manager. Check if integrated video or PCI-E graphics card is enabled in BIOS. A similar operation can be done programmatically using the NVIDIA or Catalyst Control Center control panels. If the video adapter was turned off, turn it on and it will appear in the manager.
If the video adapter was configured normally, functioned without errors and suddenly disappeared, try to roll back the system to a restore point where everything was fine with it.
Don't panic if you accidentally disabled your only video adapter from Device Manager and your screen went blank. Restart your computer in Safe Mode and turn on the video adapter in the manager again. If the configuration has built-in and discrete video cards, using the BIOS you can switch the device to which the initial image output will be carried out.
In this case, resetting the BIOS to default values also helps.
Device Manager is, of course, essential for managing your computer. Without it, you won't be able to configure your hardware properly to get the most out of your PC. The key to reliable operation of the OS without annoying errors and crashes is keeping the drivers of the devices involved up to date, disabling unnecessary equipment and reinstalling problematic components. Windows Device Manager will help you with this.
Device Manager is a utility built into all versions of Windows. By opening it, you can see what equipment is installed on your computer, check and, if necessary, update drivers, turn off or activate almost any element.
Knowing how to open (remote control), you can identify equipment that has certain problems.
Windows XP Device Manager
One of the oldest is Win XP. It owes its popularity to its simple interface and easy control of various computer parameters via remote control.
So how do you open XP Device Manager? The easiest way, which, by the way, is also suitable for Windows 7.8, is to use Press Win+R or select the “Run” option from the “Start” menu. In the window that appears, you need to enter devmgmt.msc and click “OK”.

There is another way to get into the Win XP remote control. You should have a My Computer icon on your desktop. Right-click on it and select the “Properties” option from the drop-down menu. A window will appear where you need to open the “Hardware” section, and then go to “Device Manager”.
Note: The Win button is located in the lower left area of the keyboard (between fn and alt). It shows the Windows logo.
How to open Device Manager on Windows 7?
Opening the remote control on the Win 7 operating system is no less easy. There are also several ways here:
- On your desktop, right-click on the “My Computer” icon. Go to Properties. A window with system information will open. In the left menu you will see the “Device Manager” section.
- Call the Start menu by clicking on the corresponding button. Log in to the Control Panel. Install small icons, find and go to the manager section.
- In the Start menu there is a search bar where you need to enter the word “dispatcher”. Select the option you need and click LMB.

You can open the window by pressing the win and pause keys simultaneously. Here again select the section you are looking for in the left menu. Now you know how to open Device Manager on Windows 7.
Remote control for Windows 8
Some users do not know how to open Device Manager on Windows 8, because this operating system appeared relatively recently. In fact, it is very easy to get into the DU here.
You can use the command line and enter the words discussed above there. Also in the case of this OS, the first method of the previous subsection (system properties) is suitable.
You can open the remote control in two clicks. To do this, right-click on the “Start” button and select the “Device Manager” option from the drop-down menu.

So, you've learned how to open Device Manager on multiple operating systems. All that remains is to familiarize yourself with its capabilities.
What actions can be performed in the remote control?
In the manager you can see what equipment is installed. By opening a section, for example, “Monitors”, you will see the name of the device. Would you like to receive more complete information about it? Then right-click on it and select “Properties”.
Here you can see disabled devices or those that have some problems. Depending on the situation, there will be a warning cross icon next to them).
If there is a need to update drivers or get information about them, right-click on the device and go to “Properties” in the drop-down menu. A window will open where you need to select the “Driver” section.
In the remote control you can turn off the equipment. In this case, you will not be able to deactivate the processor and some other devices, since the corresponding button will be missing.
You can see which device the equipment conflicts with in “Properties”, “Resources” section.
Errors in Device Manager
Almost all errors in the remote control have their own code. To troubleshoot a problem, you need to know at least about the most common codes. Here are just a few of them:
- “Code 1” indicates that drivers may not be installed for the equipment, or they are not configured.
- “Code 14” means that for the equipment to operate correctly, you need to restart the OS.
- “Code 31” indicates unstable operation of the device. The reason is the drivers. You will most likely need to download new software.
Conclusion
Now you know how to open Device Manager, so you can independently monitor the operation of your hardware and drivers. By the way, it is recommended to turn off some devices on laptops so that the battery holds its charge longer.
Device Manager is a component of the Windows operating system that is designed to manage devices connected to your computer. Device Manager first appeared in Windows 95 and was later added to Windows 2000. In NT versions of the Windows operating system, it appeared as a snap-in in the Microsoft Management Console.
Device Manager displays all connected devices. Here you can determine whether the connected device is working correctly, change its operating parameters, and install or remove drivers. In order to determine how a device works, you just need to pay attention to its icon. If a device is not working properly, it will be indicated in Device Manager by an icon with a black exclamation point inside a yellow triangle. If the device is not recognized by the operating system, it will be indicated by a yellow question mark. A disabled device is indicated by a red cross or a gray down arrow. Knowing these symbols, you can quickly determine which device has problems and what needs to be done to solve them.
In many instructions for setting up the Windows operating system that are published on the Internet, you can find recommendations on using Device Manager. But it is not always explained to the user in sufficient detail how to open Device Manager, what it is and how to work with it.
In this article, we will try to close this gap by describing all the main ways to open Device Manager in all major versions of the Windows operating system.
How to open Device Manager in Windows 10 or Windows 8
If you are using the Windows 10 or Windows 8 operating system, you can open Device Manager using a new menu that opens using the Windows-X key combination or by right-clicking on the START menu.
This menu appeared in Windows 8 and has since been available in all versions of Windows. In addition to Device Manager, you can use it to open other standard utilities of the Windows operating system. For example, using this menu you can open Power Management, Event Viewer, Network Connections, Disk Management, Computer Management, etc.
How to open Device Manager in Windows 7
There are different ways to open Device Manager in Windows 7. The following algorithm is most often used: open , and open the section “ system and safety».

In chapter " system and safety"Open the "System" section.
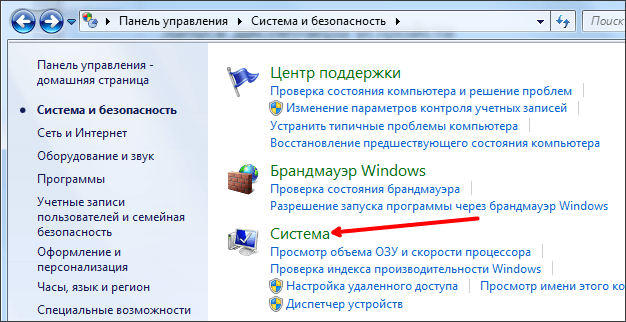
After this, a window will open with the main characteristics of this computer. Here you need to click on the link “ device Manager", which is located on the left side of the window.

After this, the Windows 7 Device Manager window will open in front of you.
How to open Device Manager in Windows XP
In Windows XP, Device Manager opens in a similar way. First, open the Start menu and go to Control Panel. In the Control Panel you need to open the “System” section.

After this, the window “ Properties of the system" Here you need to go to the “Equipment” tab.

On the equipment tab, click on the button " device Manager».

After this, the Device Manager window will open in front of you.
How to open Device Manager using command
There are also universal ways to open Device Manager that work in any version of Windows. For example, this can be done by running the command “mmc devmgmt.msc”. To do this, open the “Run” menu (key combination Windows-R) or the command line and enter “mmc devmgmt.msc”. This command works on Windows 10, Windows 7 and Windows XP.

In the Windows 7 operating system, as well as in newer versions of Windows, you can use the search bar to open Device Manager. To do this, you just need to open the Start menu and enter the phrase “Device Manager” into the search, and then open the program suggested by the system.

If you have Windows 8, which does not have a Start menu, then you can enter the phrase “Device Manager” into the search form on the Start screen.
All devices connected to a computer can be divided into two groups.
- Devices that support Plug and Play technology. They are automatically recognized by the system and do not require manual installation of software that controls their operation.
- Devices that require driver installation to function correctly. A driver is a utility program that instructs Windows on how to correctly recognize and operate a given device.
Windows 7 includes a large number of drivers for various devices. When you connect new equipment to your computer, the system will immediately begin searching for drivers for it in its database, which will be indicated by a message in the notification area.
If the search returns positive results, the drivers will be installed and a message will appear in the notification area stating that the device has been successfully installed and is ready to use.
If Windows cannot find a suitable driver in its database, a window will open in which you will be asked to directly participate in installing the driver or to refuse further actions.
If you connect hardware that was released before Windows 7 to your computer, it is possible that the disc that came with it will not contain a driver compatible with the new operating system, and the installation will end with an error message. In this case, you should go to the device developer’s website, look for an updated driver for Windows 7 and download it to your computer. Typically, drivers on developer sites are presented along with the installation program, so their files have the EXE extension. To start the installation in this case, just double-click on the downloaded file and follow the instructions of the installation program. A tooltip in the notification area will notify you that the driver installation for the new hardware has been successful.
device Manager
You can conveniently monitor and change the status of equipment connected to your computer, troubleshoot problems, and update drivers in the Device Manager window.
To open Device Manager, click Start Control Panel System and Security and in the System section click the Device Manager link. You can also open this window by typing device manager into the search box in the Start menu and clicking on the link found. A link to it is also present in the system properties window.
Device Manager provides a list of all devices connected to your computer. They are grouped according to their purpose. To view the contents of a group, click the arrow to the left of its name.
If a device is marked with a yellow exclamation mark in the list, it means that Windows has recognized it, but it is not working correctly. The reason for this may be either internal conflicts with the system or outdated drivers that are incompatible with Windows 7. To understand the cause of the failure, open the device properties window by double-clicking on its icon. The General tab displays a description of the device status and the problem that caused the problem. If the culprit is uninstalled or outdated drivers, you can update them without leaving this window.
Latest site materials
Video

How to enable and disable Push Notifications?
Apple is responsible for the correct operation of Push notifications in iOS. Any third-party application that wants to send notifications to the user must use Apple servers for this. The scheme looks like this: the developer will raise his own ser
Video

Download themes for Android phone The best themes for your phone
I wanted to post wallpapers for a mobile phone - I don’t think it’s worth talking about the fact that they will look great only at the resolution indicated in the title, in other cases they will be stretched out or, conversely, not on the entire screen. Pictures
Social media

Yandex browser constantly starts: how to cancel the launch, make the browser launch without an additional window
Yandex is a popular browser that pleases its fans with a high level of functionality. A careful study of the program allows us to note the stability and reliability of its operation, user-friendly interface, and prompt loading of any pages. Despite this, in
Video

Reservation: general and separate
Classification of redundancy methods INCREASING RELIABILITY RESERVATION AS A METHOD Redundancy is one of the main means of ensuring a given level of reliability (especially failure-free operation) of an object when elements are not reliable enough.

Computer

What is VKontakte signa, let's look at this question today. Until the moment of writing this article, I heard the word signa somewhere, but I didn’t even think about what a signa is and why they are made on VKontakte. The social network VKontakte has a lot of oddities and signals like p
Samsung Galaxy Note9 smartphone review: almost flawless